Sunday, December 14, 2008

Year 2008 Winds Down

Time kept ticking away and so many small projects were unfinished on the entry doors to the house. I think the projects were neglected because I thought it would take more time than it did to complete them so I procrastinated a little.

As fall 2008 came to an end, I finally finished this much-needed work on the outside of my house. I thank God for giving me warm weather that lasted until the week after Thanksgiving. I also thank two of my friends for their help to get these projects finished before the snow began to fly. We scraped, sanded and painted the outsides of all the entry doors and door frames. I painted the bead-board ceilings of all three porches and the master-room balcony. I sanded and painted the other screen doors and had the screens replaced. I also replaced two transom screens and some doorway trim. I used metal screen in the south porch and balcony door to keep the integrity of the house. Since the climate in Manti is so dry, I do not have to worry about the metal insect screen rusting.

What I difference new screens, new screen moldings, cleaned hardware and fresh paint made. Instead of the entry ways that were worn and shabby, they now look fresh and inviting.

Thursday, November 20, 2008

Something is Rotten in the Town of Manti

This is not a phrase describing the political hierarchy of Manti, but a sad statement about the state of my west porch that was being consumed by DRY ROT!

Dry rot is the weakening of wood by one of several species of fungus. The fungus digests the parts of the wood that give it strength and stiffness. The weakened wood is somewhat dry, hence the name “dry rot.” Dry rot usually results from too much moisture in contact with wood.

The dry rot on the trim and posts on the west porch of my house was depressing. Rain had run off the roof and rotted the trim. It had splashed on the floor of the porch and had started rotting the bottoms of the posts. Some of the turned posts were missing and the porch rails were in bad shape and coming apart. What an eyesore! I had to do something soon to prevent further damage.

I rolled up my sleeves, took out my checkbook and got started. I bought new trim at Crossroad Mills. I hired Tom’s Woodturning to turn me 24 new posts. Tom had previously turned some Newell posts for this porch, and I had bought hand railings when I repaired the front porch. Dave, my favorite handyman came over, bringing his tall ladder to start the repair job. He replaced and painted the trim then started on the porch.

When I returned from a trip to San Diego a week later, I drove in the driveway and was excited to see the porch posts were repaired or replaced and painted. What a difference! Of course Dave’s work made the rest of the porch look shabbier. I pulled out my 8-foot ladder, a bucket of oil-base primer, bought some Dutch Boy Extreme Adhesion paint and went to work. I filled in dings, sanded and painted the outside door casing, the porch ceiling and window casing. I removed the screen door to have its screen replaced. If I had known how cheap and easy that was, I would have done it sooner. I repaired, sanded and painted the door before I rehung it. I also took down an ugly shelf that was a junk collector, wondering why I had not removed it sooner.

I am planning to have raingutter hung to prevent this dry rot problem in the future.

Thursday, October 9, 2008

What is that smell?

Recently a visitor asked me, “What’s that smell?” This question could be bad or good, depending on the odor. The ambiance of a home not only comes from décor and tidiness, but can also be enhanced by a pleasant smell. I had transplanted some herbs from my garden to indoor pots before the first frost of the season. I placed the potted herbs in rooms throughout my home. The smell my visitor was enjoying was cinnamon basil.

I use several other methods to bring pleasant smells into my home. When the weather turns cold, I place an old teapot filled with water and a few cinnamon sticks, mint leaves, sprigs of lavender or drops of essential oils on my wood-burning stove. This not only adds humidity to the air, the faint odor of cinnamon or other herbs waft through the rooms. At Christmas time, I place pine oil in water in the teapot to add to the season spirit. I have scented candles placed throughout the house and sometimes use an essential oil diffuser.

Home cooking adds warmth and pleasant odors to the home. There is nothing like the smell of a pot of spicy soup or baking bread. Yum! Unlike the original owners of this house, I am fortunate to bake bread in a gas oven rather than a wood stove.

Here is my favorite dinner roll recipe.

REFRIGERATOR POTATO DINNER ROLLS
(dough can be stored in refrigerator for about a week)

1 cup milk, scalded (or warm powdered milk)
1 cup hot mashed potatoes (I mix up some instant potatoes)
½ cup oil or shortening
½ cup sugar
2 tsp. salt
1 tablespoon granular yeast
½ cup lukewarm water
2 beaten eggs
5 to 6 cups flour

Combine milk, potatoes, shortening, sugar, and salt in large mixing bowl; let stand until lukewarm. Add yeast softened in the ½ cup water and eggs. Add 1½ cups flour and beat well. Cover and let stand in warm place for 1 hour or until full of bubbles. Stir in 3½ to 4½ cups flour to make a fairly stiff dough. Knead until smooth on a lightly floured surface (I use my KitchenAid bread mixer with a dough hook). Return to greased mixing bowl; oil top of dough; cover and chill in refrigerator (or you can let it rise immediately until double in bulk, shape into rolls and let it raise again [about 30 minutes] and bake­). If you store it in the refrigerator, about 1½ hours before serving time shape desired number of rolls; place on greased pans; let rise 1 to 1¼ hours or until doubled in bulk. Bake in hot oven (425°) about 12 to 15 minutes or until lightly brown on top.
Punch down unused dough and store in refrigerator. Makes 3 dozen medium-sized rolls. Also great for making cinnamon rolls.

Cutting Cinnamon Rolls Easily


See my helpful hints on baking bread under Helpful Hints and Tips on the right side of this blog.­

Thursday, September 11, 2008

A Tisket, a Tasket, I’m in Love with Baskets . . .

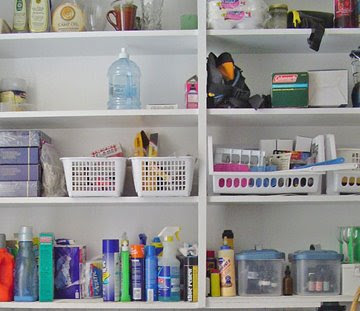
Baskets are my friends. Baskets can help organize and clear clutter in every room in your home and create the appearance of tidiness while adding interest to your decor. They come in all shapes, colors, sizes and materials. In my old house, things related are sorted and placed into baskets on shelves in the laundry room, closets and cabinets. A decorative basket filled with incoming mail is better than a pile of papers sitting on the counter. A small basket in the bathroom filled with sample-size shampoos, conditioner and lotions is great for guest's convienence. A basket in the bathroom filled with magazines and reading material helps contain clutter. I used lots of small plastic baskets in the bathroom cabinet by the sink for out-of-sight storage. Plastic is good for things that leak or spill or need to be washed from time to time. All toothpaste, dental floss and extra tooth brushes are in a small basket, hair items in another, makeup in another and so on. I rolled towels and wash clothes in a square wicker basket with brass-colored handles in the guest bath by the sink for decoration and easy access. Since I have the habit of kicking off my shoes when I enter the house, I have shallow square baskets near the outside doors just for shoes. They also help coral guest's shoes. I never use baskets that are too large or deep where items are hard to see and can get lost.

Plastic boxes, decorative boxes and plastic drawer units also come in handy. I bought a plastic drawer unit with wheels and used it for my sewing items, placed my portable sewing machine on top and rolled it into a closet out of sight.

Manti is located in a somewhat remote area so I often buy in bulk. In my basement where my extra food and supplies are kept, I sorted everything the same way a grocery store is organized, sauces together, soups, fruit, dry goods, spices, packaged food, soap and paper towels all in their own areas on the shelving units. Many smaller items like spice-mix packages are stored in plastic containers with lids or flat baskets. When I go down to find an ingredient for a recipe, it is like grocery shopping.


DEUTERONOMY
CHAPTER 28 Verse 5
Blessed shall be thy basket and thy store.

Tuesday, August 19, 2008

You Don’t Love It and It Doesn’t Love You, Release It

Moving from a home I had lived in for over twenty years helped me de-junk. Still, I had too much clutter. I was fortunate to get help from a relative and another friend who were naturals at organization; they actually enjoy doing it! I started the daunting task in the storage shed then moved to organizing the house. My master-organizer friend helped me sort items in three categories:
Trash
Keep
Give away

Sorting through my treasures and deciding what items to keep and what items had to go was painful. Fighting the thought “I might need that someday” that was stuck my brain, I waded through “stuff.” My cousin said, “If you don’t love it and it doesn’t love you, its time to release it.” This phrase helped me donate some of my neglected treasures to charity. Out went the comb-binding machine and boxes of binding combs, away to an acquaintance went my oak drafting table, chair and drafting arm, and to EBAY went my drafting templates and supplies. I was surprised and pleased how many others needed the things I had held onto, and I have not missed the clutter. It's amazing how much easier it is to organize when there is less to organize. Now my motto is: If something comes in, another item must leave and this usually works.
I have found the ancient proverb “cleanliness is next to Godliness” has merit. I believe that a tidy home allows positive energy to flow more freely and is not so frustrating to look at. If anyone needs help or ideas for reducing clutter, my daughter clued me to the website http://www.flylady.net/ a great site for packrats or some of us that just need a little help.

Thursday, August 7, 2008

Decor: Tell Your Story

I wanted my décor to reflect the era of the house and tell my story. I sorted through things I already had to find like items for grouping. In the living room I started with photographs of ancestors since genealogy and family history are two of my loves. I had them printed in sepia and framed with wooden frames. I had an old fiddle that a grandfather once played and placed some guitar strings in an old package on the front. To help tell about my heritage, I grouped the family momentous together at the corner of two walls.

Because I am an artist, displaying some of my paintings is a must. I find a mirror hung here or there is useful in opening up a room. In the photo above on the right, the mirror on one wall reflects one of my paintings which adds more dimension to the living room. As you walk across the room, the mirror discretely reflects other scenes. On the wooden sconces on either side of the mirror are a few keepsakes.
Since I grew up with the colorful Utah deserts as my playground, I am interested in geology, rocks and crystals. I grouped my fossil/rock/crystal collections in areas around the house intermixed with other keepsakes such as my father’s cribbage board and one of his favorite books. I once found a large commercial antique butter churn with my maiden name printed on the front. Since it had my name on it, I had to buy it. This is where I store my firestarters (see my Helpful Hints and Tips, Tip: Firestarters on the right side of this blog page). I grouped it with crocks, a washboard, my father’s branding iron, and a large antique-looking vase containing a few peacock feathers and some hand-carved walking sticks.

I look to the experts such as Pottery Barn catalogs, decorating magazine and books. Stores like T J Maxx and Pier 1 Imports offer fun decorating items. If you have a treasure, make it the center and decorate around it. In the kitchen I used my Mason jar collection and a few old cook books to add my interests to the décor. See my post Adding Flavor to the Kitchen

Manti has power outages now and then so a kerosene lantern is incorporated in the décor of each room. Too keep the lanterns well supplied, I found wick by the yard at http://www.wickstore.com/

Monday, August 4, 2008

Hold Me Back Before I Jump

I can be impulsive, like buying a hundred-year-old house and jumping into the project. The south balcony was so bad it could have temped me to jump in a bad sort of way. I tried to ignore it because I did not have a clue how to fix it. When I bought my Victorian, I was fortunate that the house had a new roof, but I was not to happy that the roofing material covered the floor of this guest-bedroom balcony. Stepping on it in the summer was like stepping on hot blacktop. The railings were loose and posts were rotting and falling apart. I was stumped on how to repair it. I did not opt for a wood floor, because my other balcony floor takes so much upkeep. I considered plain tile, but I just could not get excited about that idea because I was afraid it would crack or come loose during winter. I found that other people in town had tile on their porches that held up through the cold weather. As I was discussing this option with a friend, he said, “Have fun with it.” That triggered my interest, and I started shopping for tile with a pattern. I chose ceramic tiles with a rough surface so they would not be slick when wet, and drew up the floor plan to scale with a graphics program showing how I wanted them laid. I called my trusty carpenter, gave him the pattern and he went to work. When he pulled off the roofing material, he found the floor was rotting in places and was uneven so it tilted to the side. He repaired the balcony floor and installed white metal sheeting on two sides to stop water from doing damage in the future. The floor dips slightly to the center so the water runs off the balcony in the middle. He did a beautiful job laying the tile I had chosen. I replaced the railing and posts. The colors in the tile pull the gray roof, the red brick and white railings together. I now have balcony I enjoy standing on, especially when the breeze is rustling the leaves of the cottonwood trees and bird are singing or flying about. When I look down I often see butterflies flitting about in the flower bed below. It is a job where money was well spent. The tile made it through this last cold, long winter and has not shown any wear or damage.

Saturday, July 19, 2008

Stripping: Not for Entertainment

When renovating an old house you usually need to strip or replace porch railings, doors or moldings. I did a little of each and it was not entertaining. My old house has 5 outside doors with porches or balconies. That is a lot of posts to refinish or replace. As mentioned in the previous blog, I had replacement posts turned by an expert woodturner.

To strip turned posts, I bought a plastic flat storage container just longer than the posts and wide enough to hold several posts. I poured enough Citrisrip (about 1 large bottle) in the container to come 1/2 way up on the sides of the several posts and sealed it with the lid. I soaked the posts for several hours turning them over from time to time. After the paint bubbled and lifted, I took each post and scrapped off as much paint as possible into a separate container then returned the posts to the plastic container to soak again in the stripper. When most of the paint was loosened and wiped or scrapped away, I rinsed off the posts and let them dry. I used a utility knife or any other tool that worked to dig paint out of creases. I sanded the posts with a Makita BO5010 5-inch Hook & Loop Random Orbit Sander (one of my favorite tools). I hand sanded any places that the sander could not touch.

To strip woodwork or doors, I used plastic drop cloths. I folded the drop cloth once and laid the door on it. I then painted the door using Klean-Strip® Strip-X® Stripper. I folded the drop cloth around the door to let the sripper soak into the paint. Every half hour or so, I would rewet the door with another coat of stripper. A couple of hours later the paint lifted as the stripper soaked through the paint to the door’s surface. The plastic helps keep the stripper from drying out. I found Jasco® stripper dried too fast for this method, but works great for a first coat to get the stripping started. Be patient and let the stripper do the work! After a couple of hours, I unfolded the drop cloth and used a 3 or 4-inch spackle knife to scrape off the paint. Sometimes I used a small chisel for hard-to-scrap places. Repeat the process until most of the paint is removed then sand. For woodwork, I painted it with stripper and cut strips of a drop cloth and covered the stripper-covered moldings. The wet stripper held the plastic in place. I would pull back the plastic and rewet the molding with more stripper from time to time until the paint bubbled down to the bare wood.

Monday, July 7, 2008

On to the Outside

I finally moved to working on the outside of the house. Exiting to the outside of the house is easy since I have five outside doors, two upstairs and three downstairs. When I had a locksmith rekey all the deadbolt locks, he had a box of skeleton keys in his van. He let me dig through them until I found a key that fit almost every lock on the inside doors of the house. I went to the fabric store and found small tassels to hang from each key. It is those small details that make renovating so much fun.

My handyman poured and finished new sidewalks that wind up to the dining room and living room porches. The previous sidewalk was made of brick and with time had become uneven, a real ankle buster. I followed the same pattern and kept the winding effect. I had curbing poured on the street sides of the lawn and a automatic sprinkling system installed.

I discovered a wonderful mailbox. I drove up 10600 South in Salt Lake and admired a mailbox by the road near 13th East. By a stroke of luck I found one just like it and had two young men I knew dig the hole, pour the cement and help install it. I used a round cardboard mold made for pouring cement bases to line the hole in the ground and made a cardboard template showing where the bolts should be placed in the cement. After we poured the cement in the hole, I place the cardboard template on top of the cement and pushed the bolts into the cement where they were marked on the cardboard. After the cement hardened and the bolts were set in place, I lifted the mailbox and carefully set the base down right over the bolts. After tightening the nuts on the bolts, the mailbox was solid in place.

In the summer 2005, someone parked in front of my house to visit the Manti pageant. In the process of parking, they backed into the mailbox. The post snapped in two. Fortunately, it is made of cast aluminum, and I was able to find a shop that was skilled in welding aluminum and had it repaired. After touching up some paint, It looks as good as new.

The porch railings and posts needed a lot of work. Some of the posts were rotting while others were in good shape. I did not want to replace all of them so I found a wood craftsman who took one of the posts and turned others like them on his lathe using the original post as a pattern. I had them made out of redwood so they will last longer. I shopped around for porch railings and finally found some I liked at Crossroads Mill in Draper. The railings were surplus from the historical Cove Fort Restoration, and I bought them at a good price. Their employees have been especially helpful in aiding me in finding other moldings I needed from their stock, and the mill also turned rosettes for me. Even though I am not one of their major customers, they still gave me great service.

On the east of the house is weed patch next to the street. I have not decided whether to bring in gravel or to black top the area or look for another option for making the area tidy and still stay useful for parking. I need to get bids on each option and look at pros and cons. Any ideas anyone?

Thursday, July 3, 2008

A Couch Potato - At Last!

Hanging the crown molding in the office/den was the most challenging chore because of crooked walls. My best friends helped me. I almost gave up, but they cheered me on to the finish. I am finally enjoying this room without staring at the 10-foot walls and grumbling, “I hate this wallpaper!”

I was going to paint the walls slate blue, but the swatches I tried just did not work out, so I went for the similar cream color that I painted other rooms.

I wanted what my son lovingly calls “white-trash furniture,” a couch that reclines. After all, this room is for comfort. I thought I wanted a leather one, but I shopped around and could not find one I liked. I was suddenly inspired with the thought, “Don’t discount fabric.”

I went back to R.C. Willey furniture store, and found a couch and chair that were covered in micro fiber that looks like leather. When I sat in it and reclined it back, it continued to gently rock back and forth—sooo relaxing! When I told the salesperson how much I liked it, she said, “It’s not supposed to continue rocking like that. The mechanism must be broken.” I told her that I liked it that way. She called her supervisor and told him that I wanted to buy the floor-model chair and it was broken. He told her that I could buy it and gave me several hundred dollars off the price too.

Faux leather, reclining furniture with plastic decorative nails, and even the chair is a reclining rocker. My son visited me and commented on how comfortable the set was. He liked my “redneck” purchase.

Oh, what a life! After a long day of house fixing, to sit on a comfortable couch, grab the universal remote and escape into the world of cable TV.

A Den of Stripe-iquity

The den/office was the last room on my list for renovation. It seemed to be the most recently decorated. But according to my taste, the out-dated wallpaper was a sin. The carpet was in good shape. After a long day of house-fixing, I liked to retire to the den and vegetate, but for some reason I had a hard time relaxing. Maybe it was the floor to ceiling stripes. I felt trapped in a wallpapered with pajama-bottom fabric box. I dreaded dealing with the walls. I did not know what was under that busy wallpaper. One day a friend and I were sitting on the couch discussing the stripes that were closing in on us. I took hold of a corner of wallpaper that was lifting. I gave it a pull and down came a big chunk. Oh, oh! My friend gave another piece a yank and down it came. Well, den renovation had begun whether I was ready or not.

I jumped into wallpaper removal with gusto. I was pleasantly surprised to find that a previous owner had stripped off all the layers of old wallpaper before applying their wallpaper. The latest layer of wall paper and the underlying wallpaper practically fell off in my hands, Yeah.

I was going to attempt to put drywall mud on the walls that were rough but had a thin coat of paint. My left wrist was having problems because of tendinitis from working on the computer so much so I struggled with attempting that project. My trusted drywaller came to my rescue again. I hired him the put up a new ceiling, and skim coat the walls. I think some jobs should be left to the experts and this was one of them.

I sanded and painted the woodwork, painted the walls, repaired and repainted the door, stripped paint off the hardware, installed crown molding and hung a new light/fan. The old fan/light had several feet of wire wound around inside the box and some wire sticking out around the edge.

Wednesday, July 2, 2008

Titanic to Luxury

After the bathroom was saved from sinking into the crawl space and was put back together, I replaced the chair railing, baseboard and much of the bead board. I used pine bead board to match what was already in the room. I took more work because of the knotholes, but it has more character than MDF. I painted the room the same beige as some of the other rooms in the house and painted the trim white. I ordered a cast iron claw-foot tub from California and had it installed. I chose chrome feet and fixtures because according to a Victorian-plumbing expert, brass was not used much until the 1930’s and after. Besides, brass is harder to maintain. I chose a new tub over an old one that would have had to be refinished because my plumbing expert said the original finish of a tub is fired at a much higher temperature than a refinish is and the finish would last longer. Sometimes finish on a reconditioned tub can sliver. I ordered the tub and fixtures through a plumbing store that gave me free shipping. They loaded it into my pickup and away I went. It took a couple of burly men to get the crate out of my truck when I got home. Cast iron is heavy, but is so nicer than man-made material.

I did not like how the shower curtain hung down blocking the view of the rest of the room, so I bought cafe curtain tie backs, painted them white to pull the shower curtain back against the wall when not in use.


I found a ceramic shelf to install on the wall at the front of the tub for shampoo and other items. I bought a soap rack on EBAY for a fraction of the cost of the same item at a bath store. I also repaired the window ledge and installed a plantation blind.

Ahh - now candles, scented bubbles and a hot bath in a claw foot tub. Luxury at last!

Disaster Anyone?

Disaster. This words best described the downstairs bath room. The photo of the bathtub does not look too bad, but looks can be deceiving.

My furnace stopped in December 2003 so the pipes froze under the bathroom floor. When I inspected them, I discovered the bathroom floor joists were bug eaten, dry rotted, badly patched and one end was hanging off the foundation. My handyman ripped out the floor, tub and the wall separating the toilet from the rest of the room. The tile around the tub had been installed over old tile over mildewed walls.

The floor had to be rebuilt with added supports in the crawl space. My handyman also laid tile, leveled the cabinet and repaired the walls. He repaired or installed new plumbing.

The linoleum was inexpensive and had rips in it and was replaced with ceramic tile. Not everything went down with the ship. The mirror, lights and pedestal sink were in great shape.

Adding Flavor to the Kitchen

I faux painted the 1950’s cabinet blue, used a tall cabinet I had brought down from the upstairs bathroom and one from the corner of the kitchen and painted them to match. I trimmed all the upper cabinet tops with captain’s railings. The two extra cabinets added a lot more storage. When I stripped the hinges on the kitchen cabinets, I discovered that they were made of copper. I bought copper pulls and knobs to match. I modified a maple shelf I had bought several years earlier for my last house and had not used. I hung it by the kitchen table. I brought the same look to it by adding captain rails around the sides and front.

I used my mason-jar collection to decorate the tops of the cabinets and added a few extra items, including copper bowls, and other accessories to match the cabinet hardware.
I painted and repaired the textured wall paper and hung a period-style chandelier over the table area.

My handyman leveled the floor, added pot lighting, an extra plug, repaired the area under the stove, installed a new dishwasher and removed the fake-brick linoleum.

Croft-Beck floors refinished the original pine/oak floor. I bought several braided rugs to soften up the room. In the meantime, I can now enjoy the charming room until I have the finances to do it right.

A Kitchen Stew

If my kitchen was stew, it would have been tasteless and bland. I did not have the finances to remodel the room like I wanted to. One day I could not stand the stark look and bad lighting anymore. A friend had creatively and inexpensively redecorated a little home she had purchased and it inspired me do to something, anything with this drab room.

The textured wall paper had never been completely painted and was stark white. This room with its white on white was not a place where I wanted to hang out, let alone cook.

Even the steps up to the porch off the kitchen were dangerous and built on sand. My handyman rebuilt them. I also had a motion light installed to make the porch area safer.

Down We Go!

Stairways are sometimes a challenge in old houses and mine are a little steep, but not as bad as many I have seen. My handyman crafted the railings going down the stairway from the second floor to match the fall of the steps. Handrails are a must! The tall ceiling and walls above the stairway was really fun (NOT) to paint for someone as short as me. I continued the oak floors from the two of the bedroom out into the hallway leading to the stairway.

When is a Closet a John?

Old houses are often short on bathrooms. The upstairs bathroom that was converted from a closet just needed a good coat of paint and a small cabinet to store toiletries. I painted the room a soft sage green. I found a cabinet at the Salvation Army that fit perfectly next to the pedestal sink. I also bought an over-the-John cabinet at Linens and Things, at a closeout price. My brother helped me install it. I decorated the walls with photos of my granddaughters in sepia tones. My daughter is a professional photographer so I get some great shots as you can see on her web site: http://www.nrimages.com/

There was a nice shower that had been installed by a previous owner. The bathroom might be small, but it beats having to traipse downstairs in the dark of night.

Grandmas Welcome Here

This bedroom needed the least work. I patched and painted it and bought furniture, shipped from Virginia. The style is called “Grandma’s Attic” by Vaughan Furniture Co.

Because the wall in the bedroom bends with the line of the roof, the top of the dresser mirror frame was too high. A friend cut a piece of wood that I placed on the back of the mirror support to bring the mirror a little forward on the dresser. It worked perfectly.

The toughest and most expensive project in this room was repairs to the balcony to the south. See my blog entry: Hold Me Back Before I Jump.

Now I Can Lay Thee Down to Sleep.

All in all, the north guest bedroom is a pleasant place for guests to sleep. The new oak flooring is beautiful and takes little care. To finish the room, I repaired installed and painted baseboards, painted walls, lined the closet and furnace closet with cedar, installed a door to the furnace closet and found a matching antique doorknob. A family friend made casing for the furnace closet door frame to match the other casing in the room.

I visited my daughter near Los Angeles, and we went shopping to find more doorknobs and transom hardware. I did not find any, but I found a special assembly so the antique knob I did have could be used with the newer door. I still need to replace the drafty window and am still not up to speed on window treatments.

Chess Anyone?

The north guest bedroom floor was painted a blue and cream checker-board pattern and the walls were an off-colored yellow.

There was no heat to the upstairs, so I had a closet built for a place to install a furnace. (I wish I had installed a furnace unit that also included air conditioning. The upstairs get much hotter than the down stairs. Also the ducts should be larger with another vent in each room. The vents make too much noise when they furnace comes on. This something I will have to have redone eventually. Another lesson learned!)

My favorite drywaller textured the added wall to match the other walls. The duct work for the furnace is in the attic, and the wiring and gas line was run up an old chimney space of the fireplace that was removed long ago. At the same time, I also had new wiring installed and now all the rooms upstairs are on different circuits.

A Room with a View


The view from the balcony of the master bedroom is one main reasons I was drawn to this house. The master bedroom balcony looks east at the Manti Temple. Hours of hard work has made a beautiful room with a beautiful view. This photo is a sample of my daughter's work as seen on her site at http://www.nrimages.com/

Mastering the Master Bedroom

The view from the balcony of the master bedroom is one reason I was drawn to this house.

The upstairs’ rooms needed a lot of repairs. The floors in the master bedroom and one of the other bedrooms had slightly sagging floors because of the length of the spans. The sub floors had to be ripped up and the floor joist reinforced. New subfloors were installed.

Painted hardware is one of my pet peeves, so I as I worked on the bedroom, I strip the paint off the hardware as I did with the other rooms in the house. I repaired and painted the walls that wonderful cream color and the trim white semigloss. The closet was not finished in the inside, so I lined it with cedar.

Some of my family volunteered to help lay hardwood. They had some experience, and I took a class on how to lay hardwood floors. We stayed up and worked for 22 hours straight installing oak flooring. I rented a power undercut saw that is used to cut off the bottom of door mouldings so we could slide the oak planks under them. It was a real time-saving tool and I highly suggest using one. The manual undercut saw recommended to me took way too much time and effort to do the same job.

Croft-Beck Floors finished the floors. I always hire professionals to finish wood floors. A bad job is costly in the long run because it can do so much damage.

My handyman rebuilt the balcony floor off the master bedroom and laid ash flooring which I varnished with marine varnish. The east porch and balcony was attached to house only by the roof of the balcony, so he bolted it to the house.

I rebuilt the railings and reinstalled them, one job that took forever and gave me fits at every turn.

I loved the bedroom set when I first saw it. I bought it before I moved to Manti and it really filled the small bedroom of my previous home. Little did I know how well it would match this home.

Washroom Gets a Cleaning

The laundry room is small, but it took a lot of work to repair. Although the shingles were new, the roof above it leaked, and the original installer could not find and fix the leak.

I tore out the sagging ceiling and discovered that if I stood on the stairs, I could look up and see light where the roof met the brick wall above the room. I called in a roofing expert, and he finally found the problem was the flashing. He fixed it so I could go ahead and repair the ceiling. I ripped out some of the lath and plaster and blown-in insulation fell everywhere. I had to haul away insulation and dirt from under the stairs, bucket by bucket full. I insulated the ceiling area and the wall facing the kitchen. My trusted drywaller replaced the ceiling and the wall with drywall. He also repaired places were the plaster was badly damaged.

Some of the casings were missing, so an old family friend carved replacements. He did a wonderful job matching the original.

I replaced the beadboard with MDF (was easier and smoother than pine in this room), floor mouldings, chair rail, and stripped the paint off all the hardware. I painted the room my favorite cream color with white trim and installed a blind, painted and organized the original shelves and added a large boxed light.

The linoleum was in bad shape. My handyman rebuilt the sub floor and laid ceramic tile. The plumbing had to be redone for the new washer and dryer. I put up a handy unit to hang up the mop, broom, duster etc.

Down in the Dungeon

Manti basements are the scariest places on the planet. Mine was no exception. The walls were rock and mortar with plenty of niches for spiders to spins their webs and with cement plastered here and there.

The stairs going down to the basement were especially treacherous. My handyman rebuilt the stairs and custom made a hand railing that followed the line of the wall by the stairs. He also repaired the area at the bottom of the stairs, building a box to hide the plumbing and finished off the landing area. I finished and painted some of the walls. I also installed baseboard at the landing to finish off the area.

The furnace worked part time and was plumbed into an old oil-burning monster.

I hired a plumber to remove the oil burning furnace (what a filthy mess) and moved the gas furnace out of the center of the room to the back wall. It had to be reducted. The furnace only worked some of the time, so after several service calls and hundreds of dollars in repairs, I had a new one installed.

I plastered the walls of the one-room basement with cement then finished them with plaster and paint.

I repaired and painted the floor and installed movable shelving units for storage. I especially like the Seville Classic Chrome 48 wide x 72 high inch shelving units. I could buy 2 units and link them together to make 3 units. They are sturdy and easy to install. The heavy casters on the bottom roll easily and lock in place if desired. I also like the small rack at the back that keeps items from falling behind the unit. I like the idea of being able to relocate shelving as needed.

An electrician installed a new electric panel to replace the old fuse box. I also had the electric meter on the outside of the house replaced to bring it up to code. The electrician removed the outdated panel on the kitchen porch and run the existing wires to the new panel in the basement. I also had a new light installed so the basement was not so dark and scary.

Dining in Style?

I think the dining room looks so much more inviting and airy. The new wall color makes the used bricks come alive. Croft-Beck Floors repaired and refinished the floors. I was amazed they could sand off all the remaining tar so easily. The problems with the pine floors are they are so soft and damage easily. But the refinished pine floor goes with the time period of the house and are wonderful to look at.

The dining set is made by Pulaski. I used some antique crocks, an antique commercial butter churn and other furniture I already owned or picked up on sale to furnish the room. The art on the walls are my oil paintings.

The wood burning stove is perfect for taking the chill off the air on cold winter mornings and helps supplement heating costs. I still have not found the perfect rugs or window treatments for this room.

Dining in Blue?

See the interesting orbs captured on a photograph
taken with disposal camera.
Here is a photograph of the dining room before its makeover.
Blue! That is the word for this room. I stripped off three layers of wallpaper. The latest layer was blue with small white dot. The paper made the room look dark. Fortunately the wallpaper had never been painted. I used a product called Wallwik® that when wet, stuck to the walls like a wet towel, holding moisture on the paper to keep it damp. It made stripping the wallpaper much easier.

I stripped about one wall at a time (only an area one package of Wallwik® could cover). Before using the Wallwik® I scored the wallpaper with a wallpaper-scoring tool, which is specifically designed to score wallpaper. This tool has notched teeth that perforate and lift the wallpaper as it rolls along. I added a chemical used for stripping wallpaper into the warm water in a bucket to sponge or spray on the wall to keep the Wallwik® wet. Plaster over lath in old Victorians handle water better than wallboard in newer houses. Patience is important in this process. I kept spraying the wall with a spray bottle from time to time as I saw it drying out especially near the ceiling. In the meantime, I worked on another project. After a couple of hours the paper was well soaked, and I was able to peel most of it off the wall.
My handyman tore up the fake-brick linoleum, pressed wood and also installed crown molding.
Under the linoleum was asphalt tile, tar paper and gooey tar. I expended a lot of effort and time to remove as much tar as I could. The tar paper was nailed down with hundreds of nails. My daughter came to my rescue by helping me with the tedious chore of removing tar and nails. I chiseled away tar. I heated some tar with an old iron on top of a metal cookie sheet until it was soft enough to scrape off. What a job!

My favorite, but now retired, dry-waller skimmed coated walls and installed wallboard on the ceiling. I painted the walls a cream color and the ceiling, door and moldings white. The paint on the walls changes as the light in the room changes. Sometimes it looks pinker then other times it has a golden hue.

The wood-burning stove hearth was built from bricks taken from the old Manti Store after it was torn down. The dark wall paper overpowered the brick.

Living Room: Now to the inside!

After clearing out the resident ghosts, I moved on to the scarier projects at "my old house."

In the living room, there was a crack down the middle of the ceiling from the joist that sagged in the bedroom floor above it. First, After friend removed the floor in the bedroom above the living room, I had the joists repaired and reinforced. A skilled drywaller put in a new ceiling. He did wonderful finish work with no flaws.

My sister and I put up new crown molding, and I sanded and repainted all the mouldings. I hung blinds on all the windows. The windows have storm windows so I do not feel the need to replace them as yet.

A friend rewired the original ceiling light fixture and I shopped around until I found three opaque glass shades that match the center glass.

A contractor wired a light fixture on the east porch and added an outlet in the living room by the door. He also rebuilt the porch floor and steps, taking it back to the original design and supported the steps with a cement slab.

Croft-Beck Floors refinished the original pine floors in October 2004. This room was almost finished! I furnished the room from Ashley, LazyBoy and a few other pieces I found on sale. With a couple of antiques I already owned, three new rugs, and miscellaneous accessories the room was almost done. I would still like to improve on the window treatments, but am stumped on what to get.

My most exciting find was the hanging on the north wall. I looked and looked for something I liked, but alas, my taste was too expensive. One day I said, "I would settle for a blanket to hang there." That night I took a friend out for dinner. We walked from where we parked to the sandwich shop. Wow, hanging in the Ephraim Drug store window was a throw blanket of the historic Manti Temple! It matched the rest of the decor perfectly. The room is now a peaceful sanctuary.

Getting started

Log: November 2001:

I was fortunate to obtain a scan of an old photo of the house. The house was built in 1897 for John and Almira Hall. This photo will be a great help in matching the missing gingerbread trim on the porches and possibly the cresting and finials on the roof.
When I purchased the house in October 2001, this century-old Folk Victorian was showing its age, somewhat neglected and a little abused. This blog will show some of the process of it being rejuvenated to its former beauty, one room at a time. Like a vain woman, the house abhorred its flaws and was delighted with the prospect of becoming a showpiece instead of an eyesore. Although a few of the previous owners had made some improvements and restoration, there was still plenty to do.
One of the first things I did after cleaning the inside of the house was have about a dozen Chinese elms cut down. They were planted too close to the back fence, two of them blocked the view of the Manti temple and one was right where the east sidewalk needed to end. At least I had firewood for a few years. I left two large cottonwoods in the front of the house. I also planted several fruit trees.

Wednesday, May 28, 2008

Welcome to my old house.

June 2008 - Captain's log of My Old House.

I am making a blog about restoring or renovating an old house; accomplishments, lesson learned, mistakes and helpful hints/tips. The crowning project of my years of home repairs and remodeling is renovating a turn-of-the century Victorian house in the small town of Manti, Utah. The project is not finished and might never be completely finished. There will always be "one more" thing.

I started on the inside to make the house livable and worked my way out from there. For several years neighboring residences thought the house might be vacant. What I have done is an example of what tenacity and perseverance can accomplish. I believe what made this project unique is I am a older single woman with a limited income and time restrictions who took a shabby old house and transformed it into a lovely lady. I refer to with a female gender, because like me, the house that was once ragged and worn around the edges has become a proud woman who is still improving in many ways with age. Age has certainly added charm and unique qualities to my old Victorian! One example is the divot worn into the floor between the dining room and kitchen where people stopped to push the two way swinging door open. When I refinished the old pine planks, I purposely left the worn place there to continue to help tell the story of the people who called the house their home over the years.

I will not claim I know everything about refurbishing an old home, but I have learned a thing or two. I welcome your stories about this subject and any helpful suggestions.

I still have to repair and repoint bricks on the outside, replace trim and gingerbread. I am torn between using some man-made material rather than wood. Upkeep is so difficult in extreme weather. So far I have used wood, trying to keep the integrity of the original structure. I am interested in rain chains instead of downspouts when I have rain gutter installed. What do you think? Finding transom hardware for 12 doors is a challenge, one I have not faced yet.

p.s. The previous owner of the house was required to declare to prospective buyers that it was haunted because of Utah's laws. No ghosts there now. But that is another story - maybe another blog.